
Ledger #1 - exploring Japanese Structures
The Receipt Book or the Hantori Chō

So for my first structure, I’m going a bit easy on myself because right now I’m still exploring the substack platform. I haven’t made one of these books myself before, but I have made lots of Japanese style account books (the Daifuku Chō) and I quite enjoy making those.
This one is a receipt book - I guess the idea is that you can tear out pages to give to customers? Ikegami says that it was often used as sketch book too. I expect it to open very nicely based on what I’ve seen so far of the directions, but it will be interesting to see in the end.
The two books that I’m looking at today are the classic, still in print, best-in-show book on Japanese bookbinding in English - Kōjirō Ikegami’s Japanese Bookbinding and the eclectic Books, Boxes and Wraps by Marilyn Webberley and JoAn Forsyth.


The two books have a very different styles of tutorials. Ikegami (hereafter Ik) is mostly photos with numbered steps whereas the Webberley/Forsyth (hereafter W/F) book is all hand drawings.
I wasn’t really intending to look at two books but they both cover the same structure and I feel like approaching any Japanese style book without discussing the Ikegami directions really isn’t cricket.
But I’ve marked a bunch of projects from the W/F book that I think will be fun to try for this purpose so kudos to them for catching my eye so often as I flipped through thinking about this substack project.
I reviewed the materials required and found both books have their challenges there. Paper availability is notoriously variable by country. The systems for identifying paper are ridiculous and so I’ll talk about what I use but not sure that anyone else can necessarily find the same materials.
For the textblock paper I used this paper from the Japanese Paper Place. It’s machine made and inexpensive and, for me, readily available, but still Japanese. They are a wholesaler so you can’t buy directly from them but you can get it from washi arts in the USA. As an easy to find alternative, I would suggest as a reasonable cost Sumi-e paper - about 50 gsm is good. The paper should be easy to fold and to pierce, but not a tissue. For the covers, I used a katazome paper - which is a Japanese stencilled paper - this gorgeous red paper.
I made two models - one with manila folder as a stiffener to make the covers and one where I just laminated two pieces of the Katazome together. I strongly preferred the second model without the manila. In the books, the directions specify 2 sheets of Japanese pasteboard (Ik) and Cover paper, heavy-weight paper, a bond or Bristol board (W/F). Bristol is comparable to the manila folder stock but the bristol I have in my paper stash is less flexible, so I used the manila for my mockup.
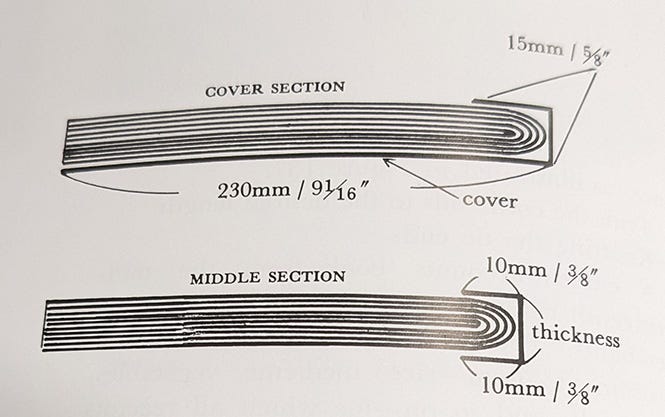
The book is made of 3 signatures of equal size (or humanely as noted in W/F near equal size).
I made the covers first - It’s a three part cover - front, back, and centre pieces. Image is from Ik.
For the first book’s cover, I glued down the decorative paper to the manila and turned it in at the fore edge only. I would do a full turn in on one that I was going to try to sell or give as a gift. For the second one, I laminated two pieces of the paper for each part of the cover and trimmed it to size. Definitely prefer the second version.
You can see the challenges with the manila in these shots from the top of the two final books. It makes for a boxy cover. I didn’t like it.


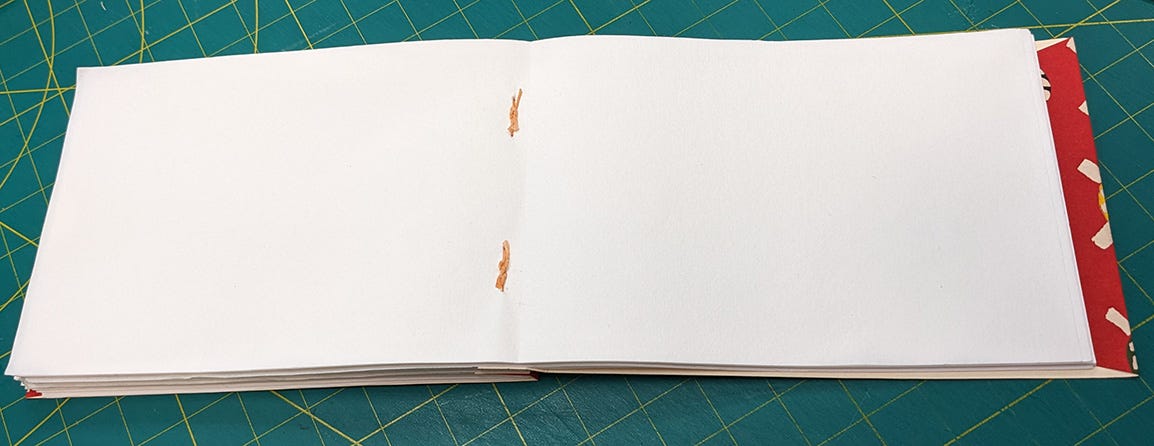
One challenge that I found was how to punch the holes evenly for the decorative cord. In both W/K and Ik, they state that you should paste on the decorative paper and then punch the holes from the outside.
I decided after trying the “flatten it out and pierce the fold” from the outside (without the decorative paper as I was pessimistic that it would work), I punched from the inside which is the typical way that a hand bookbinder does it. It worked better to do that and then I put on the decorative paper and just punched through the decorative paper when I put in the cord.
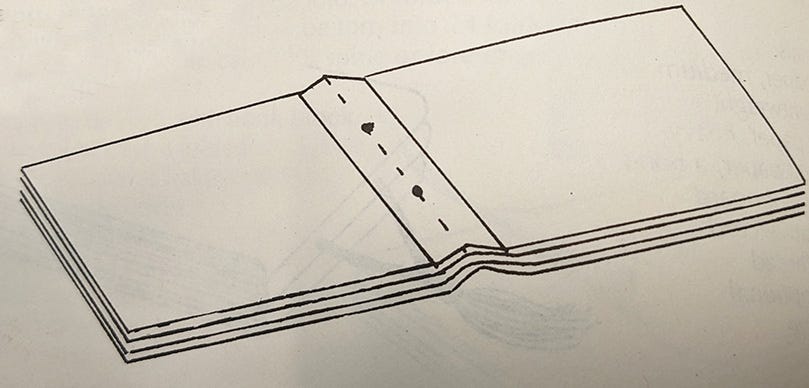
Then you sew the three signatures together the same way that stab binding are done.
The outsides of the outer signatures are not sewn in so the centre signature is fully pierced and sewn in. It’s a bit of an oddball when it’s done but I really like the look and it’s a sturdy book for sure.
Here are the two final books showing the spines and how different they look.


So final words - I think both books are clear in their instructions. I found the W/F a bit easier to follow because they used illustrations which are very clear. In Ik, there are a lot of photos that sometimes aren’t as clear. The illustrations in Ik are better though. Definitely worth trying one in the exploration of Japanese structures.
Thanks for reading! Next book will be an unusual one - it’s a traditionally sewn book with cords, but the spine covering is woven in a way. I’m unsure if it will look polished enough for my taste! Can’t wait to try it out!